Alaska PERS and SBS Reports
The Alaska PERS Report requires the setup of user permissions, three user-defined fields (UDFs) on the Workforce Administration Employment tab, one UDF on the Deduction page in Maintenance and one UDF on the Benefit page in Maintenance.
The UDFs accommodate employee contributions made through payroll deductions and employer contributions made through benefits.
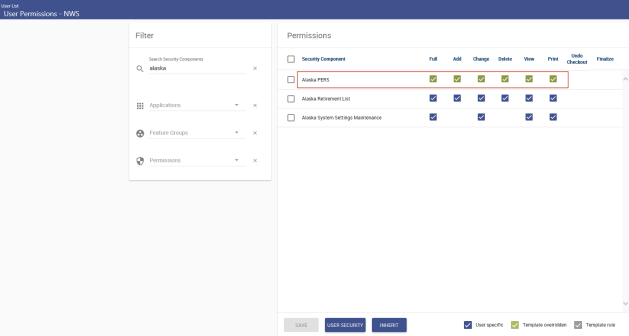
- Navigate to Maintenance > new world ERP Suite > Security > Users.
- Select the user.
- Click the Permissions button. The User Permissions page will open.
- In the Search Security Components field, type Alaska PERS Report or any part of the name, such as alaska (entry is not case sensitive).
-
The grid will refresh to show a row containing the
 Alaska PERS Report component.
 - Select each function to which the user should have access.
- Click SAVE to retain the settings. The new permissions will take effect once the user has logged off and back onto the system.
Maintenance > new world ERP Suite > System > Validation Sets > Validation Set List
The following validation sets are used in Alaska PERS reporting:
| Set Number | Name |
|---|---|
| 580 | Alaska PERS Contribution Type (new) |
| 581 | Alaska PERS Basis Type (new) |
| 582 | Alaska PERS Service Type (new) |
| 583 | AK Plan Code (existing) |
| 584 | AK PERS Occupational Code (existing) |
| 585 | Alaska PERS Event Type (new) |
The following UDFs need to be added to the Workforce Administration Employment tab:
| Record Type | Name | Data Type |
|---|---|---|
| Employee Employment | AKPlanCOde | Validation Set 583 |
| Employee Employment | AKPersonnelStatusCode | Text |
| Employee Employment | AKPERSOccupationalCode | Validation Set 584 |
- Navigate to Maintenance > new world ERP Suite > Security > User-Defined Fields. The User-Defined Field List page will open.
- Select Employee Employment from the Record Type drop-down.
- Select Attributes from the Maintenance Type drop-down. The page will be refreshed to show a grid of existing user-defined employee fields.
- Click New. The User-Defined Fields dialog will open.
-
Complete the fields exactly as shown in the following table:
Field Value Name AKPlanCode Section Header (leave blank) Sequence Number (your choice or leave blank) Data Type Validation Set Validation Set AKPlanCode Required (leave unchecked) (The steps to set up valid entries for the AKPlanCode UDF are provided in the next section, Validation Set Values Setup.)
-
Click OK.
Repeat steps 4 through 6 for the two remaining UDFs that need to be set up. The following tables contain the entries you need to make:
Field Value Name AKPersonnelStatusCode Section Header (leave blank) Sequence Number (your choice or leave blank) Data Type Text Maximum Length 1 Required (leave unchecked) Field Value Name AKPERSOccupationalCode Section Header (leave blank) Sequence Number (your choice or leave blank) Data Type Validation Set Validation Set AKPERSOccupationalCode Required (leave unchecked) Valid entries in the AKPersonnelStatusCode UDF are as follows: F (Full Time), P (Part Time), W (Workers’ Compensation Time).
The steps to set up valid entries for the AKPERSOccupationalCode UDF are provided in the next section, Validation Set Values Setup.
When you are finished, the Employee Employment attributes grid on the User-Defined Fields List page should contain rows for the UDFs created.
To comply with the formatting requirements of the state transmittal file, values in the AKPlanCode and AKPERSOccupationalCode UDFs must be expressed precisely; the validation sets for these fields, therefore, must have values set up for use by the Alaska PERS Report.
To set up validation set values for the AKPlanCode UDF, follow these steps:
- Navigate to Maintenance > new world ERP Suite > System > Validation Sets > Validation Set List.
- Highlight the validation set, AKPlanCode (60000).
- Click Values. The Validation Set Values List page for AKPlanCode will open.
- Click New. The Validation Set Value page will open.
- In the Value field, type DB.
-
In the Description field, type DB.
Note: The transmittal file will use the value to identify the plan code information being sent to the state; therefore, take care to enter each value exactly as shown in these instructions.
-
Click Save/New. Your entries will be saved and cleared, and the Validation Set Value page will remain open for the entry of a new value.
Repeat steps 5 through 7 for the remaining validation set value that needs to be set up, typing DC in step 5, DC in step 6 and clicking Save in step 7. When you are finished, the grid on the Validation Set Values List page should contain a row for each value you have saved.
To set up validation set values for the AKPERSOccupationalCode UDF, follow these steps:
- Navigate to Maintenance > new world ERP Suite > System > Validation Sets > Validation Set List.
- Highlight the validation set, AKPERSOccupationalCode (60002).
- Click Values. The Validation Set Values List page for AKPERSOccupationalCode will open.
- Click New. The Validation Set Value page will open.
- In the Value field, type A.
-
In the Description field, type All Others in PERS.
Note: The transmittal file will use the value to identify the plan code information being sent to the state; therefore, take care to enter each value exactly as shown in these instructions.
-
Click Save/New. Your entries will be saved and cleared, and the Validation Set Value page will remain open for the entry of a new value.
Repeat steps 5 through 7 for the remaining validation set values that need to be set up, clicking Save after making entries for the final value. Type each Value exactly as shown in the left column of the table below:
Value Description C Inland Boatman Union in PERS E Elected Officials in PERS/EPORS Members in EPORS F Firemen in PERS J Non-Contributing Judges in JRS L TRS Legislator in TRS M Marine, Mates, Pilots in PERS P Peace Officer in PERS R Contributing Judges in JRS T Teachers in TRS
When you are finished, the grid on the Validation Set Values List page should contain a row for each value you have saved.
To set up an employee for Alaska PERS reporting, follow these steps:
- Navigate to Human Resources > Workforce Administration > Search (Human Resources > Employee Maintenance if you are using Employee Maintenance).
- Use the search controls to produce a list of employees.
- Click the Employee Number link for the employee you want to set up for retirement reporting. The Employee’s page will open.
-
Click the Employment tab. The tab will show existing user-defined fields, including the
PERS UDFs you set up: - Make valid selections in the appropriate UDFs.
- Click Save.
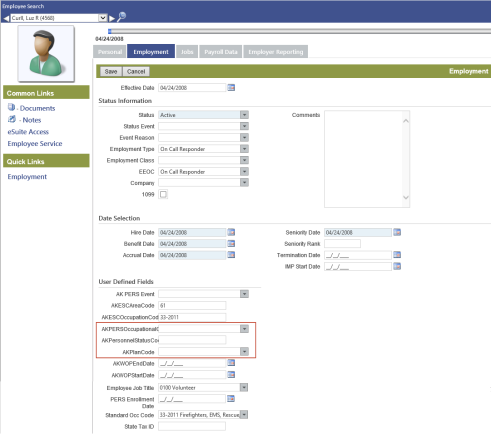
Repeat these steps for each employee who is to be included in the report.
The UDF AKPERS needs to be added to the Deduction and Benefit pages in Maintenance:
- Navigate to Maintenance > new world ERP Suite > Security > User-Defined Fields. The User-Defined Field List page will open.
- Select Deduction from the Record Type drop-down.
- Select Attributes from the Maintenance Type drop-down. The page will be refreshed to show a grid of existing user-defined deduction fields.
- Click New. The User-Defined Fields dialog will open.
-
Complete the fields exactly as shown in the following table:
Field Value Name AKPERS Section Header (leave blank) Sequence Number (your choice or leave blank) Data Type Text Maximum Length 2 Required (leave unchecked) -
Click OK.
Repeat steps 2 through 6 to set up the Benefit UDF, substituting Benefit for Deduction in step 2, and selecting 4 for the Maximum Length in step 5.
When you are finished, the Deduction and Benefit attribute grids on the User-Defined Fields List page each should contain a row for the AKPERS UDF.
Valid entries in the AKPERS Deduction UDF are as follows:
Value Description AO Additional Post Tax AR Additional Pre Tax C Contribution IO In-Debt Payments Post Tax IP In-Debt Payments Pre Tax V Voluntary Valid entries in the AKPERS Benefit UDF are as follows:
Value Description C Contribution DBUL DBUL HRA HRA ODD ODD RM Retiree Medical
To assign user-defined deductions, follow these steps:
- Navigate to Maintenance > Human Resources > Deductions and Benefits > Deductions. The Deduction List page will open.
- Select (highlight) a deduction.
- Click the User-Defined Fields button. The Deduction Code User-Defined Fields page will open.
-
Make a valid entry in the
deduction UDF you set up:
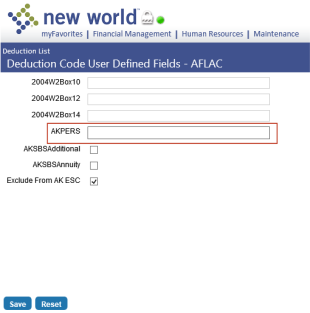
Repeat these steps to assign user-defined benefits, using Maintenance > Human Resources > Deductions and Benefits > Benefits as the path in step 1.
The Alaska SBS Report requires the setup of user permissions, two user-defined fields (UDFs) on the Workforce Administration Employment tab, two UDFs on the Deduction page in Maintenance and three UDFs on the Benefit page in Maintenance.
The UDFs accommodate employee contributions made through payroll deductions and employer contributions made through benefits.
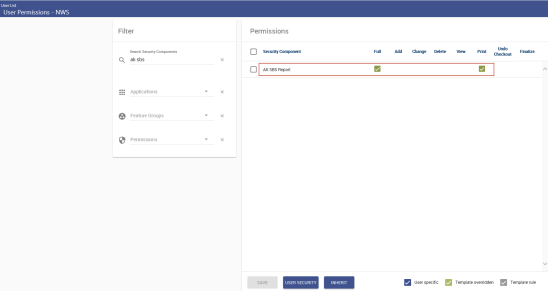
- Navigate to Maintenance > new world ERP Suite > Security > Users.
- Select the user.
- Click the Permissions button. The User Permissions page will open.
-
In the Search Security Components field, type AK SBS Report or any part of the name, such as ak sbs (entry is not case sensitive).
The grid will refresh to show a row containing the
Alaska SBS Report component. - Select the Print function.
- Click Save to retain the setting. The new permission will take effect once the user has logged off and back onto the system.
The following UDFs need to be added to the Workforce Administration Employment tab:
| Record Type | Name | Data Type |
|---|---|---|
| Employee Employment | AKWOPStartDate | Date |
| Employee Employment | AKWOPEndDate | Date |
- Navigate to Maintenance > new world ERP Suite > Security > User-Defined Fields. The User-Defined Field List page will open.
- Select Employee Employment from the Record Type drop-down.
- Select Attributes from the Maintenance Type drop-down. The page will be refreshed to show a grid of existing user-defined employee fields.
- Click New. The User-Defined Fields dialog will open.
-
Complete the fields exactly as shown in the following table:
Field Value Name AKWOPStartDate Section Header (leave blank) Sequence Number (your choice or leave blank) Data Type Date Required (leave unchecked) -
Click OK.
Repeat steps 4 through 6 for the remaining UDF that needs to be set up. The following table contains the entries you need to make:
Field Value Name AKWOPEndDate Section Header (leave blank) Sequence Number (your choice or leave blank) Data Type Date Required (leave unchecked) When you are finished, the Employee Employment attributes grid on the User-Defined Fields List page should contain rows for the UDFs created.
The following UDFs need to be added to the Deduction page in Maintenance:
| Record Type | Name | Data Type |
|---|---|---|
| Deduction | AKSBSAnnuity | Check Box |
| Deduction | AKSBSAdditional | Check Box |
- Navigate to Maintenance > new world ERP Suite > Security > User-Defined Fields. The User-Defined Field List page will open.
- Select Deduction from the Record Type drop-down.
- Select Attributes from the Maintenance Type drop-down. The page will be refreshed to show a grid of existing user-defined deduction fields.
-
Click New. The User-Defined Fields dialog will open.
Complete the fields exactly as shown in the following table:
Field Value Name AKSBSAnnuity Section Header (leave blank) Sequence Number (your choice or leave blank) Data Type Check Box Required (leave unchecked) - Click OK.
-
Field Value Name AKSBSAdditional Section Header (leave blank) Sequence Number (your choice or leave blank) Data Type Check Box Required (leave unchecked)
Repeat steps 4 through 6 for the remaining UDF that needs to be set up. The following table contains the entries you need to make:
When you are finished, the Deduction attribute grid on the User-Defined Fields List page should contain rows for the AKSBSAnnuity and AKSBSAdditional UDFs.
The following UDFs need to be added to the Benefit page in Maintenance:
| Record Type | Name | Data Type |
|---|---|---|
| Benefit | AKSBSPremium | Check Box |
| Benefit | AKSBESAdjustment | Check Box |
| Benefit | AKSBSAnnuity | Check Box |
- Navigate to Maintenance > new world ERP Suite > Security > User-Defined Fields. The User-Defined Field List page will open.
- Select Benefit from the Record Type drop-down.
- Select Attributes from the Maintenance Type drop-down. The page will be refreshed to show a grid of existing user-defined benefit fields.
-
Click New. The User-Defined Fields dialog will open.
Complete the fields exactly as shown in the following table:
Field Value Name AKSBSPremium Section Header (leave blank) Sequence Number (your choice or leave blank) Data Type Check Box Required (leave unchecked) -
Click OK.
Repeat steps 4 through 6 for the remaining UDFs that need to be set up. The following tables contain the entries you need to make:
Field Value Name AKSBSAdjustment Section Header (leave blank) Sequence Number (your choice or leave blank) Data Type Check Box Required (leave unchecked) Field Value Name AKSBSAnnuity Section Header (leave blank) Sequence Number (your choice or leave blank) Data Type Check Box Required (leave unchecked)
When you are finished, the Benefit attribute grid on the User-Defined Fields List page should contain rows for the AKSBSPremium, AKSBSAdjustment and AKSBSAnnuity UDFs.
Note: To set up employees, deductions and benefits for ESC reporting, follow the guidelines in the preceding “Employee Setup for Alaska PERS Reporting” and “Assign User-Defined Deductions and Benefits” sections.
Human Resources > State Requirements > AK > System Settings Maintenance
Note: For this option to be available on the Alaska State Requirements menu, permission to the ![]() Alaska System Settings Maintenance security component is needed.
Alaska System Settings Maintenance security component is needed.
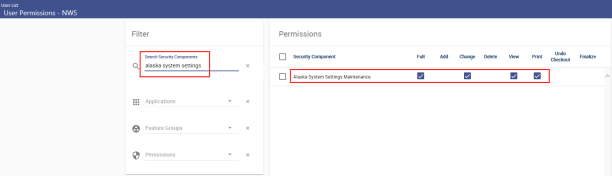
Use the Alaska System Settings Maintenance page to perform the additional setup needed to create retirement data for the Alaska PERS and SBS reports. The setup includes employer information, leave hours balance, employment changes, events, the benefits and deductions used to calculate employee and employer contributions and the hours codes used to report service hours.
Note: The Alaska PERS and SBS data will go on the same transmittal file.
The page is segmented into three tabs:
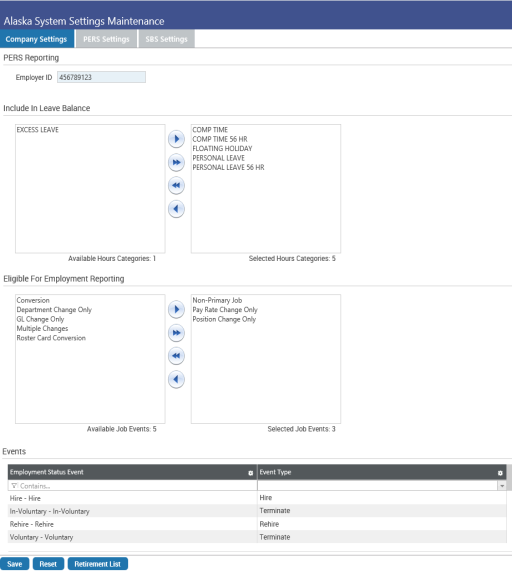
You may click Save after selections have been made on each tab, or you may wait until selections have been made on all tabs.
| Field/List Box/Grid | Description |
|---|---|
| Employer ID | Fill in the 12-digit, state-assigned employer identifier number. |
| Include in Leave Balance | Employers are required to report employee leave balances. To report paid time off hours available for an hours category, move the category from the Available Hours Categories list box to the Selected Hours Categories list box. |
| Eligible for Employment Reporting | Certain changes to an employee’s employment record are required to be reported to AK PERS. To report these changes, move the appropriate job events from the Available Job Events list box to the Selected Job Events list box. Selected job events will create an employment record detail during the create process. |
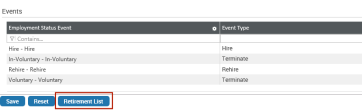
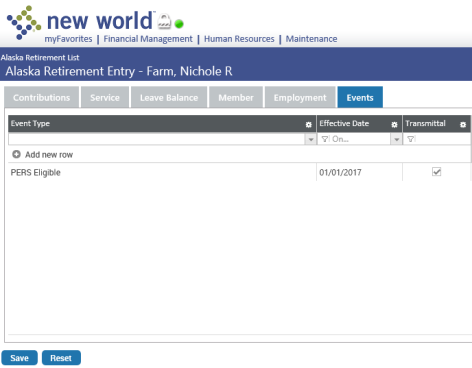
| Events | Changes to an employee's employment status are required to be reported. Use the Events grid to map your current employment status events to event types the Alaska retirement system has pre-defined as reportable. The Event Type column contains values from validation set 585-Alaska PERS Event Type. |
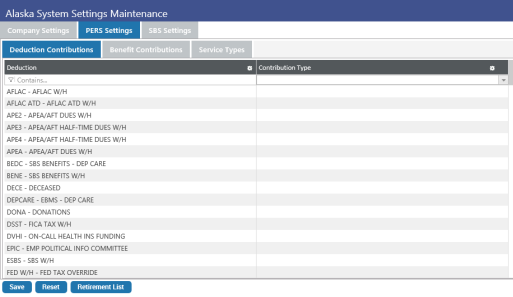
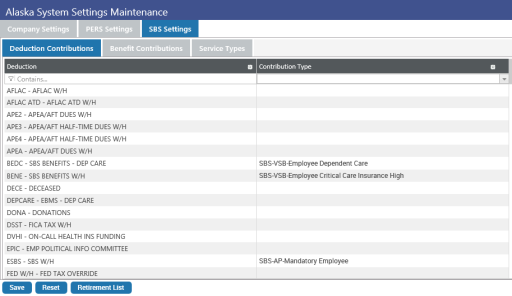
Use the PERS Settings tab to assign contribution types to deduction and benefit codes and service types to hours codes for PERS reporting. Use the SBS Settings tab to do the same for SBS reporting.
Note: If you do not report SBS contributions, you may skip the SBS Settings tab.
The Contribution Type drop-down will not contain selections for an SBS benefit code that appears on the PERS Settings tab; the selections will be available on the SBS Settings tab.
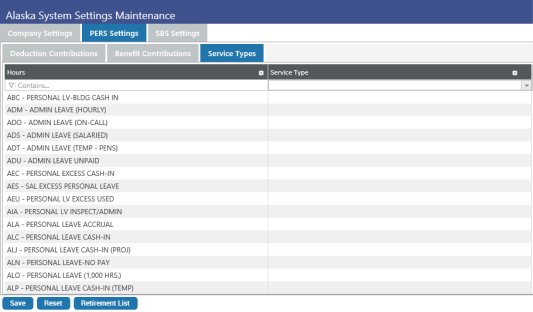
The PERS and SBS ![]() Service Types tabs track the number of reportable hours per pay period. For each applicable hours code on these tabs, assign a corresponding Service Type that determines whether the hours are paid hours; for example, any hours that belong to a leave-without-pay hours code (LWOP Hours) will not be counted towards retirement.
Service Types tabs track the number of reportable hours per pay period. For each applicable hours code on these tabs, assign a corresponding Service Type that determines whether the hours are paid hours; for example, any hours that belong to a leave-without-pay hours code (LWOP Hours) will not be counted towards retirement.
To let you move back and forth easily from Alaska System Settings Maintenance to the Alaska Retirement List page, a ![]() Retirement List button has been added to the Alaska System Settings Maintenance page, and a
Retirement List button has been added to the Alaska System Settings Maintenance page, and a ![]() Settings button has been added to the Alaska Retirement List page.
Settings button has been added to the Alaska Retirement List page.
Once you have set up the necessary UDFs and selected the company, PERS and SBS settings in Alaska System Settings Maintenance, you will be ready to create an on-screen work file of retirement system data that will be available for the Alaska PERS and SBS reports. This data may be reviewed and modified before it is transmitted to the state.
To create the work file, follow these steps:
-
Navigate to Human Resources > State Requirements > AK >
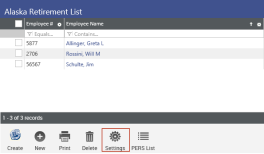
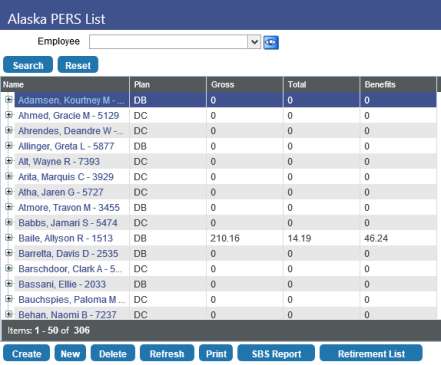
Retirement List.Note: This page is new. If you want to use the previous version of the retirement list, the
Alaska PERS List, click the PERS List button at the bottom of the page.The grid on this page contains retirement data from the last time the work file was created, with each row in the grid corresponding to an employee record. If you are running this process for the first time, the grid will be empty.
-
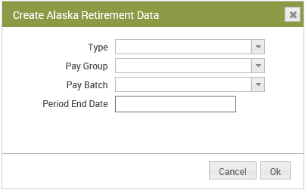
Click the Create button. The
Create Alaska Retirement Data dialog will open.To accommodate times when a personnel file may need to be created and uploaded to the Alaska Retirement System prior to the upload of a payroll file, personnel and payroll files may be created independently of each other.
- Select the Type of data that will be created: Personnel Only, Payroll Only or Personnel and Payroll.
- Select the Pay Group and Pay Batch for which payroll data will be collected. These selections are required when the Type is Payroll Only or Personnel and Payroll. Since each pay batch has a unique identifier, the report is run for one pay group and one pay batch at a time. When the Type is Personnel Only, leave these fields blank.
- In the Period End Date field, fill in the end date of the 12-month period for which personnel data will be collected. This entry is required when the Type is Personnel Only or Personnel and Payroll. The format must be MM/DD/YY, with the forward slashes (/) included. When the type is Payroll Only, leave this field blank.
-
Note: Personnel data always is collected from the last 12 months, while payroll data is collected from the pay group and batch selected.
- Click OK to create the retirement data.
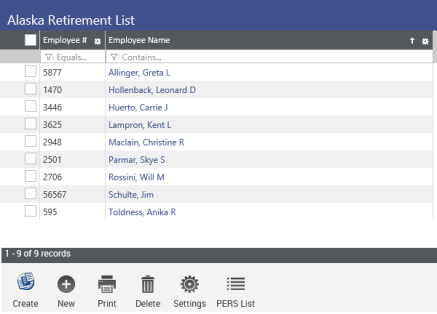
If you need to edit data for an employee, click the hyper¬linked Employee Name. The Alaska Retirement Entry page will open. If you need to add an employee to the grid on the Alaska Retirement List page, click the New button at the bottom of the page. An Add Employee dialog will open, providing a field for selecting the employee.
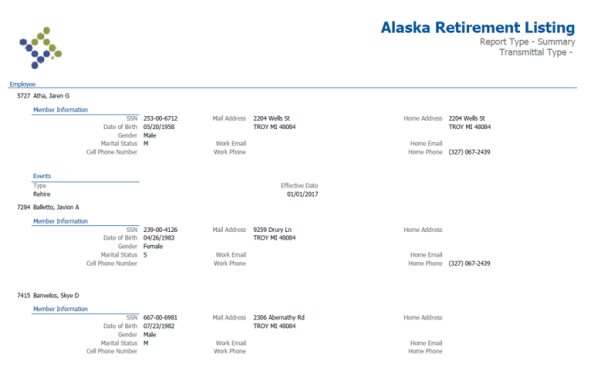
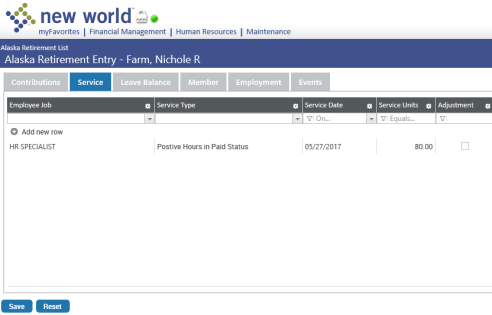
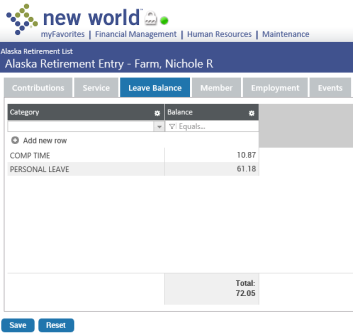
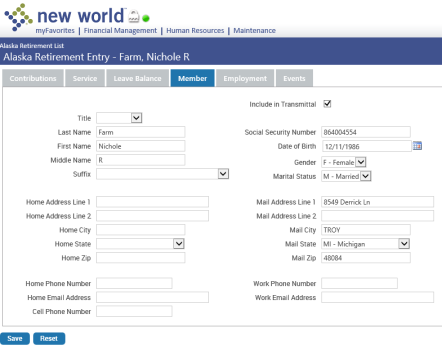
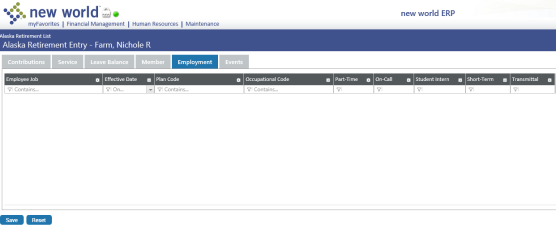
The Alaska Retirement Entry page has six tabs that will contain a combination of payroll data and member data.
The data that will be used to create the payroll transmittal file consists of the following:
-
To edit a record, select the appropriate row and fill in the details of a new retirement contribution record. To add a record, select the + Add new row at the top of the grid and populate the values accordingly. To delete a row, hover over the row and click on the X at the far-right end of the row.
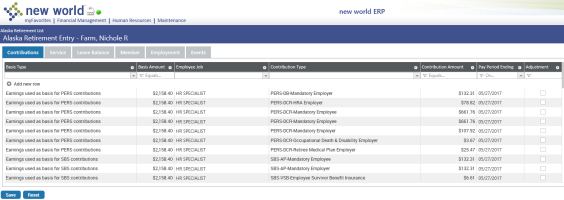
The Alaska Retirement Entry page has six tabs that will contain a combination of payroll data and member data. The data that will be used to create the personnel transmittal file consists of the following:
To generate and display the Alaska Retirement Reports containing the latest retirement data, click the Print button at the bottom of the Alaska Retirement List page. A ![]() dialog will appear with multiple report output options.
dialog will appear with multiple report output options.
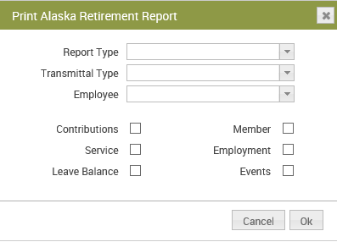
| Field | Descriptions |
|---|---|
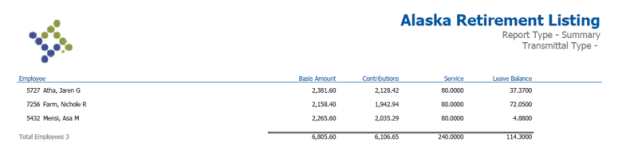
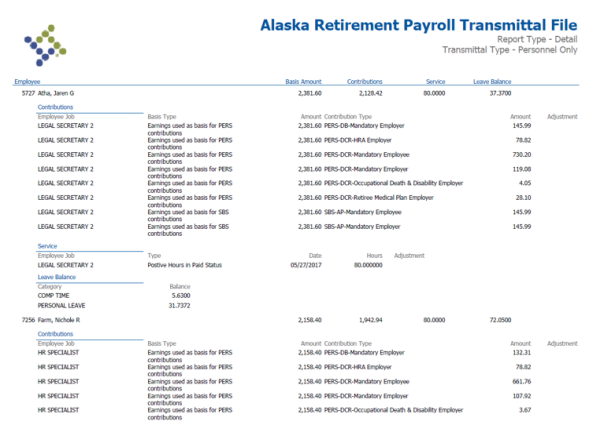
| Report Type | Required. The available options are Detail and Summary. The Detail report will display all contributions, with the details of each contribution listed individually. The Summary report will sum all the contributions into one line for each employee. |
| Transmittal Type | Required. Select whether the transmittal file data will be Personnel Only, Payroll Only or a combination of Personnel and Payroll. |
| Check Boxes | Select the check boxes next to the types of data you want to include on the PDF report. If no check box is selected, the report will not contain data. The transmittal reports selected during the print process will always display all the available data, regardless of the check boxes selected. |
Only data present in the list pages will be used to create retirement data reports.
If the create process was completed for personnel data only, you will see only personnel data in the reports. If the process was completed for payroll data only, the retirement list will contain data for the payroll transmittal only, and the reports, therefore, will hold data within the payroll tabs only: Contributions, Service and Leave Balance.
Upon submitting the reporting data, the selected reports will be generated and sent to myReports.